C#.NET理解Task和async await原理

本文将详解C#类当中的Task,以及异步函数async await和Task的关系
目录
一.Task的前世今生
1.Thread
一开始我们需要创建线程的时候一般是通过Thread创建线程,一般常用创建线程方式有以下几种:
        static void Main(string[] args)
        {
            Console.WriteLine("begin");

            Thread thread = new Thread(() => TestMethod(2));
            thread.IsBackground = true;//设置为后台线程,默认前台线程
            thread.Start();

            Thread thread1 = new Thread(() => TestMethod1());
            //设置thread1优先级为最高,系统尽可能单位时间内调度该线程,默认为Nmal
            thread1.Priity = ThreadPriity.Highest;
            thread1.Start();

            Thread thread2 = new Thread((state) => TestMethod2(state));
            thread2.Start("data");
            thread2.Join();//等待thread2执行完成
            Console.WriteLine("end");
        }

        static void TestMethod(int a)
        {
            Thread.Sleep(1000);
            Console.WriteLine($"TestMethod: run on Thread id :{Thread.CurrentThread.ManagedThreadId},is threadPool:{Thread.CurrentThread.IsThreadPoolThread}" +
                $",is Backgound:{Thread.CurrentThread.IsBackground}, result:{a}");
        }

        static void TestMethod1()
        {
            Thread.Sleep(1000);
            Console.WriteLine($"TestMethod1: run on Thread id :{Thread.CurrentThread.ManagedThreadId},is threadPool:{Thread.CurrentThread.IsThreadPoolThread}" +
                $",is Backgound:{Thread.CurrentThread.IsBackground},no result ");
        }

        static void TestMethod2(object state)
        {
            Thread.Sleep(2000);
            Console.WriteLine($"TestMethod2 :run on Thread id :{Thread.CurrentThread.ManagedThreadId},is threadPool:{Thread.CurrentThread.IsThreadPoolThread}" +
               $",is Backgound:{Thread.CurrentThread.IsBackground},result:{state}");
        }
输出结果:
begin
TestMethod: run on Thread id :4,is threadPool:False,is Backgound:True, result:2
TestMethod1: run on Thread id :5,is threadPool:False,is Backgound:False,no result
TestMethod2 :run on Thread id :7,is threadPool:False,is Backgound:False,result:data
end
begin
TestMethod1: run on Thread id :5,is threadPool:False,is Backgound:False,no result
TestMethod: run on Thread id :4,is threadPool:False,is Backgound:True, result:2
TestMethod2 :run on Thread id :7,is threadPool:False,is Backgound:False,result:data
end
由于我的PC是多核CPU,那么TestMethod和TestMethod1所在两个线程是真正并行的,所以有可能输出结果先后不确定,虽然TestMethod1所在线程设置优先级为Highest最高,但可能系统不会优先调度,其实目前不怎么推荐用Thread.Start去创建线程,缺点大概如下:
- 因为在大量需要创建线程情况下,用Thread.Start去创建线程是会浪费线程资源,因为线程用完就没了,不具备重复利用能力
- 现在一个进程中的CLR默认会创建线程池和一些工作线程(不要浪费),且线程池的工作线程用完会回到线程池,能够重复利用,
除非是以下原因:
真的需要操作线程优先级
需要创建一个前台线程,由于类似于控制台程序当初始前台线程执行完就会退出进程,那么创建前台线程可以保证进程退出前该前台线程正常执行成功
例如在原来的例子注释掉thread2.Join();,我们会发现输出完控制台初始的前台线程输出完end没退出进程,只有在TestMethod2(该线程冻结2秒最久)执行完才退出
        static void Main(string[] args)
        {
            Console.WriteLine("begin");

            Thread thread = new Thread(() => TestMethod(2));
            thread.IsBackground = true;//设置为后台线程,默认前台线程
            thread.Start();

            Thread thread1 = new Thread(() => TestMethod1());
            //设置thread1优先级为最高,系统尽可能单位时间内调度该线程,默认为Nmal
            thread1.Priity = ThreadPriity.Highest;
            thread1.Start();

            Thread thread2 = new Thread((state) => TestMethod2(state));
            thread2.Start("data");
            //thread2.Join();//等待thread2执行完成
            Console.WriteLine("end");
        }
输出:
begin
end
TestMethod1: run on Thread id :5,is threadPool:False,is Backgound:False,no result
TestMethod: run on Thread id :4,is threadPool:False,is Backgound:True, result:2
TestMethod2 :run on Thread id :7,is threadPool:False,is Backgound:False,result:data
需要创建一个后台线程,长时间执行的,其实一个Task的TaskScheduler在Default情况下,设置TaskCreationOptions.LongRunning内部也是创建了一个后台线程Thread,而不是在ThreadPool执行,在不需要Task的一些其他功能情况下,Thread更轻量
  Thread longTask = new Thread(() => Console.WriteLine("doing long Task..."));
  longTask.IsBackground = true;
  longTask.Start();

//等价于

   new Task(() => Console.WriteLine("doing long Task..."), TaskCreationOptions.LongRunning).Start();
   //OR
   Task.Facty.StartNew(() => Console.WriteLine("doing long Task..."), TaskCreationOptions.LongRunning);
2.ThreadPool
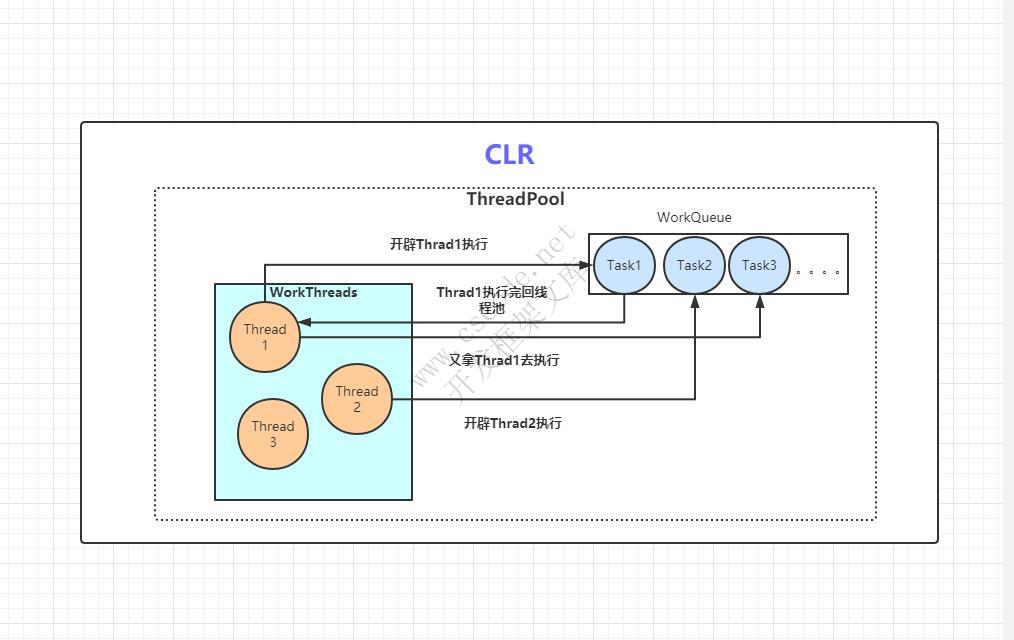
一个.NET进程中的CLR在进程初始化时,CLR会开辟一块内存空间给ThreadPool,默认ThreadPool默认没有线程,在内部会维护一个任务请求队列,当这个队列存在任务时,线程池则会通过开辟工作线程(都是后台线程)去请求该队列执行任务,任务执行完毕则回返回线程池,线程池尽可能会用返回的工作线程去执行(减少开辟),如果没返回线程池,则会开辟新的线程去执行,而后执行完毕又返回线程池,大概线程池模型如下:
我们通过代码来看:
        static void Main(string[] args)
        {
            //获取默认线程池允许开辟的最大工作线程树和最大I/O异步线程数
            ThreadPool.GetMaxThreads(out int maxWkThreadCount,
                                     out int maxIOThreadCount);
            Console.WriteLine($"maxWkThreadCount:{maxWkThreadCount},
                              maxIOThreadCount:{maxIOThreadCount}");
            //获取默认线程池并发工作线程和I/O异步线程数
            ThreadPool.GetMinThreads(out int minWkThreadCount,
                                     out int minIOThreadCount);
            Console.WriteLine($"minWkThreadCount:{minWkThreadCount},
                              minIOThreadCount:{minIOThreadCount}");
            f (int i = 0; i < 20; i++)
            {
                ThreadPool.QueueUserWkItem(s =>
                {
                    var wkThreadId = Thread.CurrentThread.ManagedThreadId;
                    var isBackground = Thread.CurrentThread.IsBackground;
                    var isThreadPool = Thread.CurrentThread.IsThreadPoolThread;
                    Console.WriteLine($"wk is on thread {wkThreadId},
                                      Now time:{DateTime.Now.ToString("ss.ff")}," +
                        $" isBackground:{isBackground}, isThreadPool:{isThreadPool}");
                    Thread.Sleep(5000);//模拟工作线程运行
                });
            }
            Console.ReadLine();
        }
输出如下:
maxWkThreadCount:32767,maxIOThreadCount:1000
minWkThreadCount:16,minIOThreadCount:16
wk is on thread 18, Now time:06.50, isBackground:True, isThreadPool:True
wk is on thread 14, Now time:06.50, isBackground:True, isThreadPool:True
wk is on thread 16, Now time:06.50, isBackground:True, isThreadPool:True
wk is on thread 5, Now time:06.50, isBackground:True, isThreadPool:True
wk is on thread 13, Now time:06.50, isBackground:True, isThreadPool:True
wk is on thread 12, Now time:06.50, isBackground:True, isThreadPool:True
wk is on thread 10, Now time:06.50, isBackground:True, isThreadPool:True
wk is on thread 4, Now time:06.50, isBackground:True, isThreadPool:True
wk is on thread 15, Now time:06.50, isBackground:True, isThreadPool:True
wk is on thread 7, Now time:06.50, isBackground:True, isThreadPool:True
wk is on thread 19, Now time:06.50, isBackground:True, isThreadPool:True
wk is on thread 17, Now time:06.50, isBackground:True, isThreadPool:True
wk is on thread 8, Now time:06.50, isBackground:True, isThreadPool:True
wk is on thread 11, Now time:06.50, isBackground:True, isThreadPool:True
wk is on thread 9, Now time:06.50, isBackground:True, isThreadPool:True
wk is on thread 6, Now time:06.50, isBackground:True, isThreadPool:True

wk is on thread 20, Now time:07.42, isBackground:True, isThreadPool:True
wk is on thread 21, Now time:08.42, isBackground:True, isThreadPool:True
wk is on thread 22, Now time:09.42, isBackground:True, isThreadPool:True
wk is on thread 23, Now time:10.42, isBackground:True, isThreadPool:True
由于我CPU为8核16线程,默认线程池给我分配了16条工作线程和I/O线程,保证在该进程下实现真正的并行,可以看到前16条工作线程的启动时间是一致的,到最后四条,线程池尝试去用之前的工作线程去请求那个任务队列执行任务,由于前16条还在运行没返回到线程池,则每相隔一秒,创建新的工作线程去请求执行,而且该开辟的最多线程数是和线程池允许开辟的最大工作线程树和最大I/O异步线程数有关的
我们可以通过ThreadPool.SetMaxThreads 将工作线程数设置最多只有16,在执行任务前新增几行代码:
var success = ThreadPool.SetMaxThreads(16, 16);//只能设置>=最小并发工作线程数和I/O线程数
Console.WriteLine($"SetMaxThreads success:{success}");
ThreadPool.GetMaxThreads(out int maxWkThreadCountNew, out int maxIOThreadCountNew);
Console.WriteLine($"maxWkThreadCountNew:{maxWkThreadCountNew},
                  maxIOThreadCountNew:{maxIOThreadCountNew}");
输出如下:
maxWkThreadCount:32767,maxIOThreadCount:1000
minWkThreadCount:16,minIOThreadCount:16
SetMaxThreads success:True
maxWkThreadCountNew:16,maxIOThreadCountNew:16
wk is on thread 6, Now time:01.71, isBackground:True, isThreadPool:True
wk is on thread 12, Now time:01.71, isBackground:True, isThreadPool:True
wk is on thread 7, Now time:01.71, isBackground:True, isThreadPool:True
wk is on thread 8, Now time:01.71, isBackground:True, isThreadPool:True
wk is on thread 16, Now time:01.71, isBackground:True, isThreadPool:True
wk is on thread 10, Now time:01.71, isBackground:True, isThreadPool:True
wk is on thread 15, Now time:01.71, isBackground:True, isThreadPool:True
wk is on thread 13, Now time:01.71, isBackground:True, isThreadPool:True
wk is on thread 11, Now time:01.71, isBackground:True, isThreadPool:True
wk is on thread 4, Now time:01.71, isBackground:True, isThreadPool:True
wk is on thread 9, Now time:01.71, isBackground:True, isThreadPool:True
wk is on thread 19, Now time:01.71, isBackground:True, isThreadPool:True
wk is on thread 17, Now time:01.71, isBackground:True, isThreadPool:True
wk is on thread 5, Now time:01.71, isBackground:True, isThreadPool:True
wk is on thread 14, Now time:01.71, isBackground:True, isThreadPool:True
wk is on thread 18, Now time:01.71, isBackground:True, isThreadPool:True

wk is on thread 8, Now time:06.72, isBackground:True, isThreadPool:True
wk is on thread 5, Now time:06.72, isBackground:True, isThreadPool:True
wk is on thread 19, Now time:06.72, isBackground:True, isThreadPool:True
wk is on thread 10, Now time:06.72, isBackground:True, isThreadPool:True
可以很清楚知道,由于线程池最多只允许开辟16条工作线程和I/O线程,那么在线程池再开辟了16条线程之后,将不会再开辟新线程,新的任务也只能等前面的工作线程执行完回线程池后,再用返回的线程去执行新任务,导致新任务的开始执行时间会在5秒后
ThreadPool的优点如下:
- 默认线程池已经根据自身CPU情况做了配置,在需要复杂多任务并行时,智能在时间和空间上做到均衡,在CPU密集型操作有一定优势,而不是像Thread.Start那样,需要自己去判断和考虑
- 同样可以通过线程池一些方法,例如ThreadPool.SetMaxThreads手动配置线程池情况,很方便去模拟不同电脑硬件的执行情况
- 有专门的I/O线程,能够实现非阻塞的I/O,I/O密集型操作有优势(后续Task会提到)
但同样,缺点也很明显:
- ThreadPool原生不支持对工作线程取消、完成、失败通知等交互性操作,同样不支持获取函数返回值,灵活度不够,Thread原生有Abt (同样不推荐)、Join等可选择
- 不适合LongTask,因为这类会造成线程池多创建线程(上述代码可知道),这时候可以单独去用Thread去执行LongTask
3.Task
在.NET 4.0时候,引入了任务并行库,也就是所谓的TPL(Task Parallel Library),带来了Task类和支持返回值的Task<TResult> ,同时在4.5完善优化了使用,Task解决了上述Thread和ThreadPool的一些问题,Task究竟是个啥,我们来看下代码:
以下是一个WPF的应用程序,在Button的Click事件:
 private void Button_Click(object sender, RoutedEventArgs e)
 {
     Task.Run(() =>
     {
         var threadId = Thread.CurrentThread.ManagedThreadId;
         var isBackgound = Thread.CurrentThread.IsBackground;
         var isThreadPool = Thread.CurrentThread.IsThreadPoolThread;
         Thread.Sleep(3000);//模拟耗时操作
         Debug.WriteLine($"task1 wk on thread:{threadId},isBackgound:{isBackgound},isThreadPool:{isThreadPool}");
            });
         new Task(() =>
         {
             var threadId = Thread.CurrentThread.ManagedThreadId;
             var isBackgound = Thread.CurrentThread.IsBackground;
             var isThreadPool = Thread.CurrentThread.IsThreadPoolThread;
             Thread.Sleep(3000);//模拟耗时操作
             Debug.WriteLine($"task2 wk on thread:{threadId},isBackgound:{isBackgound},isThreadPool:{isThreadPool}");
         }).Start(TaskScheduler.FromCurrentSynchronizationContext());

         Task.Facty.StartNew(() =>
         {
            var threadId = Thread.CurrentThread.ManagedThreadId;
            var isBackgound = Thread.CurrentThread.IsBackground;
            var isThreadPool = Thread.CurrentThread.IsThreadPoolThread;
            Thread.Sleep(3000);//模拟耗时操作
            Debug.WriteLine($"task3 wk on thread:{threadId},isBackgound:{isBackgound},isThreadPool:{isThreadPool}");
          }, TaskCreationOptions.LongRunning);
    }
输出:
main thread id :1
//由于是并行,输出结果的前后顺序可能每次都不一样
task1 wk on thread:4,isBackgound:True,isThreadPool:True
task3 wk on thread:10,isBackgound:True,isThreadPool:False
task2 wk on thread:1,isBackgound:False,isThreadPool:False
我用三种不同的Task开辟运行任务的方式,可以看到,Task运行在三种不同的线程:
- task1是运行在线程池上,是没进行任何对Task的设置
- task2通过设置TaskScheduler为TaskScheduler.FromCurrentSynchronizationContext()是没有开辟线程,利用主线程运行
- task3通过设置TaskCreationOptions为LongRunning和默认TaskScheduler情况下,实际是开辟了一个后台Thread去运行
因此,其实Task不一定代表开辟了新线程,可为在线程池上运行,又或是开辟一个后台Thread,又或者没有开辟线程,通过主线程运行任务,这里提一句TaskScheduler.FromCurrentSynchronizationContext(),假设在控制台或者ASP.NET Ce程序运行,会发生报错,原因是主线程的SynchronizationContext为空,可通过TaskScheduler源码得知:
public static TaskScheduler FromCurrentSynchronizationContext()
{
     return new SynchronizationContextTaskScheduler();
}

internal SynchronizationContextTaskScheduler()
{
     m_synchronizationContext = SynchronizationContext.Current ??
     throw new InvalidOperationException
     (SR.TaskScheduler_FromCurrentSynchronizationContext_NoCurrent);
}
大致对于Task在通过TaskScheduler和TaskCreationOptions设置后对于将任务分配在不同的线程情况,如下图:

原生支持延续、取消、异常(失败通知)
1.延续
Task其实有两种延续任务的方式,一种通过ContinueWith方法,这是Task在.NET Framewk4.0就支持的,一种则是通过GetAwaiter方法,则是在.NET Framewk4.5开始支持,而且该方法也是async await异步函数所用到
控制台代码:
 static void Main(string[] args)
 {
      Task.Run(() =>
      {
          Console.WriteLine($"ContinueWith:threadId:{Thread.CurrentThread.ManagedThreadId},isThreadPool:{Thread.CurrentThread.IsThreadPoolThread}");
                return 25;
      }).ContinueWith(t =>
      {
          Console.WriteLine($"ContinueWith Completed:threadId:{Thread.CurrentThread.ManagedThreadId},isThreadPool:{Thread.CurrentThread.IsThreadPoolThread}");
          Console.WriteLine($"ContinueWith Completed:{t.Result}");
      });

//等价于

     var awaiter = Task.Run(() =>
     {
          Console.WriteLine($"GetAwaiter:threadId:{Thread.CurrentThread.ManagedThreadId},isThreadPool:{Thread.CurrentThread.IsThreadPoolThread}");
          return 25;
     }).GetAwaiter();
     awaiter.OnCompleted(() =>
     {
          Console.WriteLine($"GetAwaiter Completed:threadId:{Thread.CurrentThread.ManagedThreadId},isThreadPool:{Thread.CurrentThread.IsThreadPoolThread}");
          Console.WriteLine($"GetAwaiter Completed:{awaiter.GetResult()}");
     });

     Console.ReadLine();
}
输出结果:
ContinueWith:threadId:4,isThreadPool:True
GetAwaiter:threadId:5,isThreadPool:True
GetAwaiter Completed:threadId:5,isThreadPool:True
GetAwaiter Completed:25
ContinueWith Completed:threadId:4,isThreadPool:True
ContinueWith Completed:25

//事实上,运行的代码线程,可能和延续的线程有可能不是同一线程,取决于线程池本身的调度
可以手动设置TaskContinuationOptions.ExecuteSynchronously(同一线程)
或者 TaskContinuationOptions.RunContinuationsAsynchronously(不同线程)
默认RunContinuationsAsynchronously优先级大于ExecuteSynchronously
但有意思的是,同样的代码,在WPF/WinFm等程序,运行的输出是不一样的:
WPF程序代码:
      private void Button_Click(object sender, RoutedEventArgs e)
        {
            Task.Run(() =>
            {
                Debug.WriteLine($"ContinueWith:threadId:{Thread.CurrentThread.ManagedThreadId},isThreadPool:{Thread.CurrentThread.IsThreadPoolThread}");
            }).ContinueWith(t =>
            {
                Debug.WriteLine($"ContinueWith Completed:threadId:{Thread.CurrentThread.ManagedThreadId},isThreadPool:{Thread.CurrentThread.IsThreadPoolThread}");
            }, TaskContinuationOptions.ExecuteSynchronously);


            Task.Run(() =>
            {
                Debug.WriteLine($"GetAwaiter:threadId:{Thread.CurrentThread.ManagedThreadId},isThreadPool:{Thread.CurrentThread.IsThreadPoolThread}");
            }).GetAwaiter().OnCompleted(() =>
            {
                Debug.WriteLine($"GetAwaiter Completed:threadId:{Thread.CurrentThread.ManagedThreadId},isThreadPool:{Thread.CurrentThread.IsThreadPoolThread}");
            });
        }
输出:
ContinueWith:threadId:7,isThreadPool:True
GetAwaiter:threadId:9,isThreadPool:True
ContinueWith Completed:threadId:7,isThreadPool:True
GetAwaiter Completed:threadId:1,isThreadPool:False
原因就是GetAwaiter().OnCompleted()会去检测有没有SynchronizationContext,因此其实就是相当于以下代码:
 Task.Run(() =>
  {
       Debug.WriteLine($"GetAwaiter:threadId:{Thread.CurrentThread.ManagedThreadId},isThreadPool:{Thread.CurrentThread.IsThreadPoolThread}");
  }).ContinueWith(t =>
  {
       Debug.WriteLine($"GetAwaiter Completed:threadId:{Thread.CurrentThread.ManagedThreadId},isThreadPool:{Thread.CurrentThread.IsThreadPoolThread}");
  },TaskScheduler.FromCurrentSynchronizationContext());
如果在WPF程序中要获得控制台那样效果,只需要修改为ConfigureAwait(false),延续任务不在SynchronizationContext即可,如下:
 Task.Run(() =>
 {
      Debug.WriteLine($"GetAwaiter:threadId:{Thread.CurrentThread.ManagedThreadId},isThreadPool:{Thread.CurrentThread.IsThreadPoolThread}");
 }).ConfigureAwait(false).GetAwaiter().OnCompleted(() =>
 {
     Debug.WriteLine($"GetAwaiter Completed:threadId:{Thread.CurrentThread.ManagedThreadId},isThreadPool:{Thread.CurrentThread.IsThreadPoolThread}");
 });
2.取消
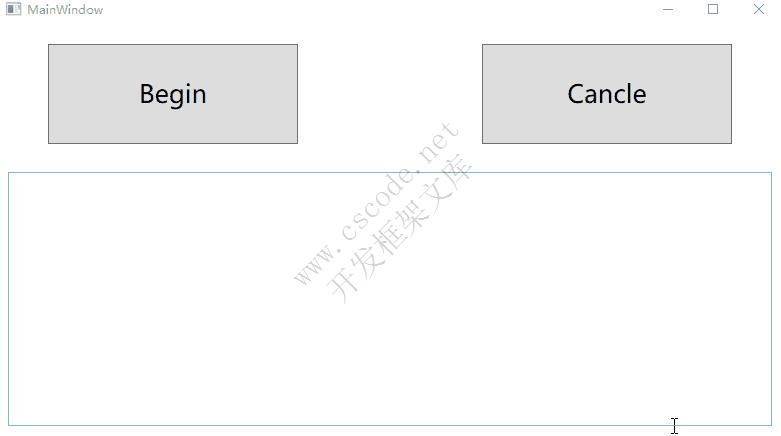
在.NET Framewk4.0带来Task的同时,同样带来了与取消任务有关的类CancellationTokenSource和CancellationToken,下面我们将大致演示下其用法
WPF程序代码如下:
CancellationTokenSource tokenSource;


private void BeginButton_Click(object sender, RoutedEventArgs e)
{

      tokenSource = new CancellationTokenSource();
      LongTask(tokenSource.Token);
}

private void CancelButton_Click(object sender, RoutedEventArgs e)
{
      tokenSource?.Cancel();
}

private void LongTask(CancellationToken cancellationToken)
{
      Task.Run(() =>
      {
          f (int i = 0; i < 10; i++)
          {
               Dispatcher.Invoke(() =>
               {
                  this.tbox.Text += $"now is {i} \n";
               });
               Thread.Sleep(1000);
               if (cancellationToken.IsCancellationRequested)
               {
                   MessageBox.Show("取消了该操作");
                   return;
               }
           }
        }, cancellationToken);
}
效果如下:
其实上述代码,也可以适用于Thread和ThreadPool,等价于如下代码:
//当TaskCreationOptions为LongRunning和默认TaskScheduler情况下
new Thread(() =>
{
    f (int i = 0; i < 10; i++)
    {
         Dispatcher.Invoke(() =>
         {
            this.tbox.Text += $"now is {i} \n";
         });
         Thread.Sleep(1000);
         if (cancellationToken.IsCancellationRequested)
         {
             MessageBox.Show("取消了该操作");
             return;
         }
   }
}).Start();

//默认TaskScheduler情况下
ThreadPool.QueueUserWkItem(t =>
{
      f (int i = 0; i < 10; i++)
      {
           Dispatcher.Invoke(() =>
           {
                this.tbox.Text += $"now is {i} \n";
           });
           Thread.Sleep(1000);
           if (cancellationToken.IsCancellationRequested)
           {
               MessageBox.Show("取消了该操作");
               return;
           }
      }
});
因此,.NET Framewk4.0后Thread和ThreadPool也同样能够通过CancellationTokenSource和CancellationToken类支持取消功能,只是一般这两者都可以用Task通过设置,底层同样调用的Thread和ThreadPool,所以一般没怎么这么使用,而且关于Task的基本很多方法都默认支持了,例如,Task.Wait、Task.WaitAll、Task.WaitAny、Task.WhenAll、Task.WhenAny、Task.Delay等等
3.异常(失败通知)
下面控制台代码:
 static void Main(string[] args)
 {
      var parent = Task.Facty.StartNew(() =>
      {
            int[] numbers = { 0 };
            var childFacty = new TaskFacty(TaskCreationOptions.AttachedToParent, TaskContinuationOptions.None);
            childFacty.StartNew(() => 5 / numbers[0]); // Division by zero
            childFacty.StartNew(() => numbers[1]); // Index out of range
            childFacty.StartNew(() => { throw null; }); // Null reference
       });
       try
       {
            parent.Wait();
       }
       catch (AggregateException aex)
       {
            feach (var item in aex.InnerExceptions)
            {
                Console.WriteLine(item.InnerException.Message.ToString());
            }
        }
        Console.ReadLine();
   }
输出如下:
尝试除以零。
索引超出了数组界限。
未将对象引用设置到对象的实例。
这里面parent任务有三个子任务,三个并行子任务分别都抛出不同异常,返回到parent任务中,而当你对parent任务Wait或者获取其Result属性时,那么将会抛出异常,而使用AggregateException则能将全部异常放在其InnerExceptions异常列表中,我们则可以分别对不同异常进行处理,这在多任务并行时候是非常好用的,而且AggregateException的功能异常强大,远远不止上面的功能,但是如果你只是单任务,使用AggregateException比普通则其实会有浪费性能,也可以这样做;
try
{
     var task = Task.Run(() =>
     {
         string str = null;
         str.ToLower();
         return str;
     });
     var result = task.Result;
}
catch (Exception ex)
{

     Console.WriteLine(ex.Message.ToString());
}

//或者通过async await
try
{
      var result = await Task.Run(() =>
      {
          string str = null;
          str.ToLower();
          return str;
      });

catch (Exception ex)
{

      Console.WriteLine(ex.Message.ToString());
}
输出:
未将对象引用设置到对象的实例。
二.异步函数async await
async await是C#5.0,也就是.NET Framewk 4.5时期推出的C#语法,通过与.NET Framewk 4.0时引入的任务并行库,也就是所谓的TPL(Task Parallel Library)构成了新的异步编程模型,也就是TAP(Task-based asynchronous pattern),基于任务的异步模式
语法糖async await
我们先来写下代码,看看async await的用法:
下面是个控制台的代码:
 static async Task Main(string[] args)
 {
     var result = await Task.Run(() =>
     {
         Console.WriteLine($"current thread:{Thread.CurrentThread.ManagedThreadId}," +
                    $"isThreadPool:{Thread.CurrentThread.IsThreadPoolThread}");
         Thread.Sleep(1000);
         return 25;
     });
    Console.WriteLine($"current thread:{Thread.CurrentThread.ManagedThreadId}," +
    $"isThreadPool:{Thread.CurrentThread.IsThreadPoolThread}");
    Console.WriteLine(result);
    Console.ReadLine();
 }
输出结果:
current thread:4,isThreadPool:True
current thread:4,isThreadPool:True
25
换成在WPF/WinFm程序执行,结果如下:
current thread:4,isThreadPool:True
current thread:1,isThreadPool:false
25
是不是感觉似曾相识?上面埋下的彩蛋在这里揭晓了,在讲Task的延续的时候我们讲到.NET Framewk4.5的一种通过GetAwaiter延续方法,事实上,async await就是上面的一种语法糖,编译的时候大致会编译成那样,所以我们一般不手动写GetAwaiter的延续方法,而是通过async await,大大简化了编程方式,说它是语法糖,那么有啥证据呢?
我们再写一些代码来验证:
class Program
{
    static void Main(string[] args)
    {
       ShowResult(classType: typeof(Program), methodName: nameof(AsyncTaskResultMethod));
       ShowResult(classType: typeof(Program), methodName: nameof(AsyncTaskMethod));
       ShowResult(classType: typeof(Program), methodName: nameof(AsyncVoidMethod));
       ShowResult(classType: typeof(Program), methodName: nameof(RegularMethod));
       Console.ReadKey();
    }

    public static async Task<int> AsyncTaskResultMethod()
    {
       return await Task.FromResult(5);
    }

    public static async Task AsyncTaskMethod()
    {
       await new TaskCompletionSource<int>().Task;
    }

    public static async void AsyncVoidMethod()
    {

    }

    public static int RegularMethod()
    {
        return 5;
    }

    private static bool IsAsyncMethod(Type classType, string methodName)
    {
       MethodInfo method = classType.GetMethod(methodName);

       Type attType = typeof(AsyncStateMachineAttribute);

       var attrib = (AsyncStateMachineAttribute)method.GetCustomAttribute(attType);

       return (attrib != null);
    }

    private static void ShowResult(Type classType, string methodName)
    {
       Console.Write((methodName + ": ").PadRight(16));

       if (IsAsyncMethod(classType, methodName))
           Console.WriteLine("Async method");
       else
           Console.WriteLine("Regular method");
    }
}
输出:
AsyncTaskResultMethod: Async method
AsyncTaskMethod: Async method
AsyncVoidMethod: Async method
RegularMethod:  Regular method
在这其中,其实async在方法名的时候,只允许,返回值为void、Task和Task<TResult> ,否则会发生编译报错,事实上,这和其编译后的结果有关,我们通过ILSpy反编译这段代码,截图关键代码:
internal class Program
{
  [CompilerGenerated]
  private sealed class <AsyncTaskResultMethod>d__1 : IAsyncStateMachine
  {
	  public int <>1__state;
	  public AsyncTaskMethodBuilder<int> <>t__builder;
	  private int <>s__1;
	  private TaskAwaiter<int> <>u__1;
	  void IAsyncStateMachine.MoveNext()
	  {
		  int num = this.<>1__state;
		  int result;
		  try
		  {
			 TaskAwaiter<int> awaiter;
			 if (num != 0)
			 {
				awaiter = Task.FromResult<int>(5).GetAwaiter();
				if (!awaiter.IsCompleted)
				{
					this.<>1__state = 0;
					this.<>u__1 = awaiter;
				    Program.<AsyncTaskResultMethod>d__1 <AsyncTaskResultMethod>d__ = this;
					this.<>t__builder.AwaitUnsafeOnCompleted<TaskAwaiter<int>, Program.<AsyncTaskResultMethod>d__1>(ref awaiter, ref <AsyncTaskResultMethod>d__);
					return;
				}
		         }
		         else
		         {
		                awaiter = this.<>u__1;
				this.<>u__1 = default(TaskAwaiter<int>);
				this.<>1__state = -1;
		         }
			 this.<>s__1 = awaiter.GetResult();
			 result = this.<>s__1;
		  }
		  catch (Exception exception)
		  {
			this.<>1__state = -2;
			this.<>t__builder.SetException(exception);
			return;
		  }
		  this.<>1__state = -2;
		  this.<>t__builder.SetResult(result);
	}
	[DebuggerHidden]
	void IAsyncStateMachine.SetStateMachine(IAsyncStateMachine stateMachine)
	{
	}
  }

  [CompilerGenerated]
  private sealed class <AsyncTaskMethod>d__2 : IAsyncStateMachine
  {
	  public int <>1__state;
	  public AsyncTaskMethodBuilder <>t__builder;
	  private TaskAwaiter<int> <>u__1;
	  void IAsyncStateMachine.MoveNext()
	  {
		   int num = this.<>1__state;
		   try
		   {
				TaskAwaiter<int> awaiter;
				if (num != 0)
				{
					awaiter = new TaskCompletionSource<int>().Task.GetAwaiter();
					if (!awaiter.IsCompleted)
					{
						this.<>1__state = 0;
						this.<>u__1 = awaiter;
						Program.<AsyncTaskMethod>d__2 <AsyncTaskMethod>d__ = this;
						this.<>t__builder.AwaitUnsafeOnCompleted<TaskAwaiter<int>, Program.<AsyncTaskMethod>d__2>(ref awaiter, ref <AsyncTaskMethod>d__);
						return;
					}
				}
				else
				{
					awaiter = this.<>u__1;
					this.<>u__1 = default(TaskAwaiter<int>);
					this.<>1__state = -1;
				}
				awaiter.GetResult();
			}
			catch (Exception exception)
			{
				this.<>1__state = -2;
				this.<>t__builder.SetException(exception);
				return;
			}
			this.<>1__state = -2;
			this.<>t__builder.SetResult();
		}

		[DebuggerHidden]
		void IAsyncStateMachine.SetStateMachine(IAsyncStateMachine stateMachine)
		{
		}
	}

    private sealed class <AsyncVoidMethod>d__3 : IAsyncStateMachine
	{
		public int <>1__state;
		public AsyncVoidMethodBuilder <>t__builder;
		void IAsyncStateMachine.MoveNext()
		{
			int num = this.<>1__state;
			try
			{
			}
			catch (Exception exception)
			{
				this.<>1__state = -2;
				this.<>t__builder.SetException(exception);
				return;
			}
			this.<>1__state = -2;
			this.<>t__builder.SetResult();
		}
		[DebuggerHidden]
		void IAsyncStateMachine.SetStateMachine(IAsyncStateMachine stateMachine)
		{
		}
	}

   [DebuggerStepThrough, AsyncStateMachine(typeof(Program.<AsyncTaskResultMethod>d__1))]
   public static Task<int> AsyncTaskResultMethod()
   {
	   Program.<AsyncTaskResultMethod>d__1 <AsyncTaskResultMethod>d__ = new Program.<AsyncTaskResultMethod>d__1();
	  <AsyncTaskResultMethod>d__.<>t__builder = AsyncTaskMethodBuilder<int>.Create();
	  <AsyncTaskResultMethod>d__.<>1__state = -1;
	  <AsyncTaskResultMethod>d__.<>t__builder.Start<Program.<AsyncTaskResultMethod>d__1>(ref <AsyncTaskResultMethod>d__);
	  return <AsyncTaskResultMethod>d__.<>t__builder.Task;
	}

  [DebuggerStepThrough, AsyncStateMachine(typeof(Program.<AsyncTaskMethod>d__2))]
   public static Task AsyncTaskMethod()
   {
		Program.<AsyncTaskMethod>d__2 <AsyncTaskMethod>d__ = new Program.<AsyncTaskMethod>d__2();
		<AsyncTaskMethod>d__.<>t__builder = AsyncTaskMethodBuilder.Create();
		<AsyncTaskMethod>d__.<>1__state = -1;
		<AsyncTaskMethod>d__.<>t__builder.Start<Program.<AsyncTaskMethod>d__2>(ref <AsyncTaskMethod>d__);
		return <AsyncTaskMethod>d__.<>t__builder.Task;
   }

   [DebuggerStepThrough, AsyncStateMachine(typeof(Program.<AsyncVoidMethod>d__3))]
   public static void AsyncVoidMethod()
   {
	Program.<AsyncVoidMethod>d__3 <AsyncVoidMethod>d__ = new Program.<AsyncVoidMethod>d__3();
	<AsyncVoidMethod>d__.<>t__builder = AsyncVoidMethodBuilder.Create();
	<AsyncVoidMethod>d__.<>1__state = -1;
	<AsyncVoidMethod>d__.<>t__builder.Start<Program.<AsyncVoidMethod>d__3>(ref <AsyncVoidMethod>d__);
   }

   public static int RegularMethod()
   {
	return 5;
   }

}
我们大致来捋一捋,事实上,从反编译后的代码可以看出来一些东西了,编译器大致是这样的,以AsyncTaskResultMethod方法为例子:
- 将标识async的方法,打上AsyncStateMachine 特性
- 根据AsyncStateMachine 该特性,编译器为该方法新增一个以该方法名为名的类AsyncTaskMethodClass,并且实现接口IAsyncStateMachine,其中最主要的就是其MoveNext方法
- 该方法去除标识async,在内部实例化新增的类AsyncTaskMethodClass,用AsyncTaskMethodBuilder的Create方法创建一个状态机对象赋值给对象的该类型的build字段,并且将状态state设置为-1.即初始状态,然后通过build字段启动状态机
实际上,上述只是编译器为async做的事情,我们可以看到通过AsyncVoidMethod方法编译器生成的东西和其他方法大致一样,那么await为编译器做的就是MoveNext方法里面try那段,这也是AsyncVoidMethod方法和其他方法不一致的地方:
private TaskAwaiter<int> <>u__1;

try
{
	  TaskAwaiter<int> awaiter;
	  if (num != 0)
	  {
		  awaiter = new TaskCompletionSource<int>().Task.GetAwaiter();
		  if (!awaiter.IsCompleted)
		  {
			  this.<>1__state = 0;
			  this.<>u__1 = awaiter;
			  Program.<AsyncTaskMethod>d__2 <AsyncTaskMethod>d__ = this;
			  this.<>t__builder.AwaitUnsafeOnCompleted<TaskAwaiter<int>, Program.<AsyncTaskMethod>d__2>(ref awaiter, ref <AsyncTaskMethod>d__);
			  return;
		  }
	  }
	  else
	  {
		awaiter = this.<>u__1;
	        this.<>u__1 = default(TaskAwaiter<int>);
		this.<>1__state = -1;
	  }
	  awaiter.GetResult();
}
我们再看看this.<>t__builder.AwaitUnsafeOnCompleted内部:
public void AwaitUnsafeOnCompleted<TAwaiter, TStateMachine>(ref TAwaiter awaiter, ref TStateMachine stateMachine) where TAwaiter : ICriticalNotifyCompletion where TStateMachine : IAsyncStateMachine
{
	try
	{
		AsyncMethodBuilderCe.MoveNextRunner runner = null;
		Action completionAction = this.m_ceState.GetCompletionAction(AsyncCausalityTracer.LoggingOn ? this.Task : null, ref runner);
		if (this.m_ceState.m_stateMachine == null)
		{
			Task<TResult> task = this.Task;
			this.m_ceState.PostBoxInitialization(stateMachine, runner, task);
		}
		awaiter.UnsafeOnCompleted(completionAction);
	}
	catch (Exception exception)
	{
		AsyncMethodBuilderCe.ThrowAsync(exception, null);
	}
}
GetCompletionAction方法内部:
[SecuritySafeCritical]
internal Action GetCompletionAction(Task taskFTracing, ref AsyncMethodBuilderCe.MoveNextRunner runnerToInitialize)
{
	Debugger.NotifyOfCrossThreadDependency();
	ExecutionContext executionContext = ExecutionContext.FastCapture();
	Action action;
	AsyncMethodBuilderCe.MoveNextRunner moveNextRunner;
	if (executionContext != null && executionContext.IsPreAllocatedDefault)
	{
		action = this.m_defaultContextAction;
		if (action != null)
		{
			return action;
		}
		moveNextRunner = new AsyncMethodBuilderCe.MoveNextRunner(executionContext, this.m_stateMachine);
		action = new Action(moveNextRunner.Run);
		if (taskFTracing != null)
		{
			action = (this.m_defaultContextAction = this.OutputAsyncCausalityEvents(taskFTracing, action));
		}
		else
		{
			this.m_defaultContextAction = action;
		}
	}
	else
	{
		moveNextRunner = new AsyncMethodBuilderCe.MoveNextRunner(executionContext, this.m_stateMachine);
		action = new Action(moveNextRunner.Run);
		if (taskFTracing != null)
		{
		    action = this.OutputAsyncCausalityEvents(taskFTracing, action);
		}
	}
	if (this.m_stateMachine == null)
	{
	    runnerToInitialize = moveNextRunner;
	}
	return action;
}

void moveNextRunner.Run()
{
  if (this.m_context != null)
  {
	 try
	 {
		ContextCallback contextCallback = AsyncMethodBuilderCe.MoveNextRunner.s_invokeMoveNext;
		if (contextCallback == null)
		{
		    contextCallback = (AsyncMethodBuilderCe.MoveNextRunner.s_invokeMoveNext = new ContextCallback(AsyncMethodBuilderCe.MoveNextRunner.InvokeMoveNext));
		}
		ExecutionContext.Run(this.m_context, contextCallback, this.m_stateMachine, true);
		return;
	}
	finally
	{
	     this.m_context.Dispose();
	}
  }
	this.m_stateMachine.MoveNext();
}
从上面的代码可以看出,其实this.<>t__builder.AwaitUnsafeOnCompleted内部就做了以下:
- 从GetCompletionAction方法获取要给awaiter.UnsafeOnCompleted的action
- GetCompletionAction内部先用ExecutionContext.FastCapture()捕获了当前线程的执行上下文,在用执行上下文执行了那个回调方法MoveNext,也就是又一次回到那个一开始那个MoveNext方法
大致执行流程图如下:
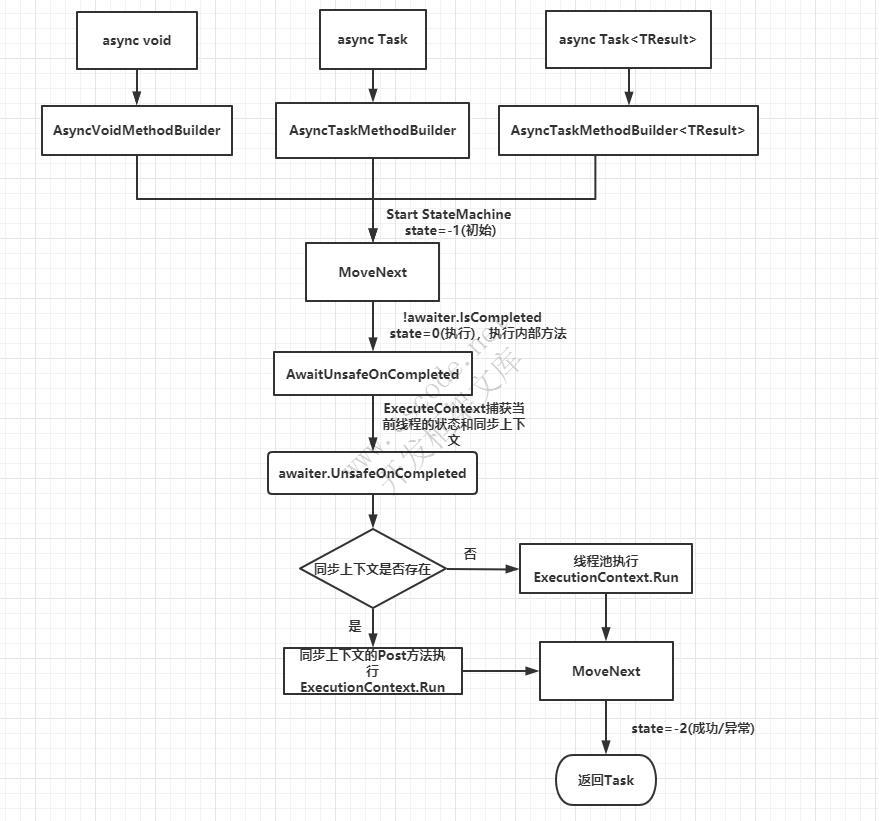
因此,我们验证了async await确实是语法糖,编译器为其在背后做了太多的事情,简化了我们编写异步代码的方式,我们也注意到了其中一些问题:
- 方法标识async,方法内部没使用await实际就是同步方法,但是会编译出async有关的东西,会浪费一些性能
- 能await Task,事实上能await Task是因为后面编译器有用到了awaiter的一些东西,例如:
- !awaiter.IsCompleted
- awaiter.GetResult()
- awaiter.UnsafeOnCompleted
确实如猜想的,像await Task.Yield()等等,被await的对象,它必须包含以下条件:
有一个GetAwaiter方法,为实例方法或者扩展方法
GetAwaiter方法的返回值类,必须包含以下条件
直接或者间接实现INotifyCompletion接口,ICriticalNotifyCompletion也继承自ICriticalNotifyCompletion接口,也就是实现了其UnsafeOnCompleted或者OnCompleted方法
有个布尔属性IsCompleted,且get开放
有个GetResult方法,返回值为void或者TResult
因此可以自定义一些能被await的类,关于如何自定义的细节,可以参考林德熙大佬的这篇文章:C# await 高级用法
async await的正确用途
事实上,我们在线程池上还埋下一个彩蛋,线程池上有工作线程适合CPU密集型操作,还有I/O完成端口线程适合I/O密集型操作,而async await异步函数实际上的主场是在I/O密集型这里,我们先通过一段代码
static void Main(string[] args)
{
     ThreadPool.SetMaxThreads(8, 8);//设置线程池最大工作线程和I/O完成端口线程数量
     Read();
     Console.ReadLine();
}

static void Read()
{
      byte[] buffer;
      byte[] buffer1;

       FileStream fileStream = new FileStream("E:/test1.txt", FileMode.Open, FileAccess.Read, FileShare.Read, 10000, useAsync: true);
       buffer = new byte[fileStream.Length];
       var state = Tuple.Create(buffer, fileStream);

       FileStream fileStream1 = new FileStream("E:/test2.txt", FileMode.Open, FileAccess.Read, FileShare.Read, 10000, useAsync: true);
       buffer1 = new byte[fileStream1.Length];
       var state1 = Tuple.Create(buffer1, fileStream1);

       fileStream.BeginRead(buffer, 0, (int)fileStream.Length, EndReadCallback, state);
       fileStream1.BeginRead(buffer, 0, (int)fileStream1.Length, EndReadCallback, state1);

}

 static void EndReadCallback(IAsyncResult asyncResult)
 {
       Console.WriteLine("Starting EndWriteCallback.");
       Console.WriteLine($"current thread:{Thread.CurrentThread.ManagedThreadId},isThreadPool:{Thread.CurrentThread.IsThreadPoolThread}");
       try
       {
          var state = (Tuple<byte[], FileStream>)asyncResult.AsyncState;
          ThreadPool.GetAvailableThreads(out int wkerThreads, out int ptThreads);
          Console.WriteLine($"AvailablewkerThreads:{wkerThreads},AvailableIOThreads:{ptThreads}");
          state.Item2.EndRead(asyncResult);
        }
        finally
        {
           Console.WriteLine("Ending EndWriteCallback.");
        }
}
输出结果:
Starting EndWriteCallback.
current thread:3,isThreadPool:True
AvailablewkerThreads:8,AvailableIOThreads:7
Ending EndWriteCallback.
Starting EndWriteCallback.
current thread:3,isThreadPool:True
AvailablewkerThreads:8,AvailableIOThreads:7
Ending EndWriteCallback.
我们看到,事实上,两个回调方法都调用了相同的线程,且是线程池的I/O完成端口线程,假如将两个实例化FileStream时的参数改下,改为useAsync: false,输出结果如下:
Starting EndWriteCallback.
current thread:4,isThreadPool:True
AvailablewkerThreads:6,AvailableIOThreads:8
Ending EndWriteCallback.
Starting EndWriteCallback.
current thread:5,isThreadPool:True
AvailablewkerThreads:7,AvailableIOThreads:8
Ending EndWriteCallback.
我们会发现这次用到的是线程池的两条工作线程了,其实这就是同步I/O和异步I/O的区别,我们可以大概看下最底层BeginRead代码:
private unsafe int ReadFileNative(SafeFileHandle handle, byte[] bytes, int offset, int count, NativeOverlapped* overlapped, out int hr)
 {
       if (bytes.Length - offset < count)
       {
            throw new IndexOutOfRangeException(Environment.GetResourceString("IndexOutOfRange_IORaceCondition"));
       }

       if (bytes.Length == 0)
       {
           hr = 0;
           return 0;
       }

       int num = 0;
       int numBytesRead = 0;
       fixed (byte* ptr = bytes)
       {
           num = ((!_isAsync) ? Win32Native.ReadFile(handle, ptr + offset, count, out numBytesRead, IntPtr.Zero) : Win32Native.ReadFile(handle, ptr + offset, count, IntPtr.Zero, overlapped));
       }

       if (num == 0)
       {
           hr = Marshal.GetLastWin32Err();
           if (hr == 109 || hr == 233)
           {
               return -1;
           }

           if (hr == 6)
           {
               _handle.Dispose();
           }

           return -1;
       }
        hr = 0;
        return numBytesRead;
 }
实际上底层是Pinvoke去调用win32api ,Win32Native.ReadFile,关于该win32函数细节可参考MSDN:ReadFile,是否异步的关键就是判断是否传入overlapped对象,而该对象会关联到一个window内核对象,IOCP(I/O Completion Pt),也就是I/O完成端口,事实上进程创建的时候,创建线程池的同时就会创建这么一个I/O完成端口内核对象,大致流程如下:
- 我们两个I/O请求,事实上对应着我们传入的两个IRP(I/O request packet)数据结构,其中包括文件句柄和文件中偏移量,会在Pinvoke去调用win32api进入win32用户模式
- 然后通过win32api函数进入window内核模式,我们两个请求之后会放在一个IRP队列
- 之后系统就会从该IRP队列,根据文件句柄和偏移量等信息去对应请求处理不同的I/O设备,完成后会放入到一个完成IRP队列中
- 然后线程池的I/O完成端口线程通过线程池的I/O完成端口对象去拿取那些已经完成IRP队列
那么在多请求的时候,IOCP模型异步的这种情况,少量的I/O完成端口线程就能做到这一切,而同步则要因为一条线程要等待该请求处理的完成,那么会大大浪费线程,正如上面一样,两个请求却要两个工作线程完成通知,而在async await时期,上面的一些方法已经被封装以Task和Task<TResult> 对象来代表完成读取了,那么上面可以简化为:
 static async Task Main(string[] args)
{
      ThreadPool.SetMaxThreads(8, 8);//设置线程池最大工作线程和I/O完成端口线程数量
      await ReadAsync();
      Console.ReadLine();
}

static async Task<int> ReadAsync()
{
      FileStream fileStream = new FileStream("E:/test1.txt", FileMode.Open, FileAccess.Read, FileShare.Read, 10000, useAsync: true);
      var buffer = new byte[fileStream.Length];
      var result = await fileStream.ReadAsync(buffer, 0, (int)fileStream.Length);
      return result;
 }
底层没变,只是回调的时候I/O完成端口线程再通过工作线程进行回调(这能避免之前回调的时候阻塞I/O完成端口线程的操作),但是大大的简化了异步I/O编程,而async await并非不适合CPU密集型,只是I/O操作一般比较耗时,如果用线程池的工作线程,就会有可能创建更多线程来应付更多的请求,CPU密集型的任务并行库 (TPL)有很多合适的api
总结
我们了解了Task是.NET 编写多线程的一个非常方便的高层抽象类,你可以不用担心底层线程处理,通过对Task不同的配置,能写出较高性能的多线程并发程序,然后探寻了.NET 4.5引入了的async await异步函数内部做了些啥,知道async await通过和TPL的配合,简化了编写异步编程的方式,特别适合I/O密集型的异步操作,本文只是起到对于Task和async await有个快速的理解作用,而关于微软围绕Task做的事情远远不止如此,例如通过ValueTask优化Task,还有更利于CPU密集型操作的TPL中的Parallel和PLINQ api等等,可以参考其他书籍或者msdn更深入了解
参考
Asynchronous programming patterns
Async in depth
ThreadPool 类
Understanding C# async / await
《CLR Via C# 第四版》
《Window核心编程第五版》


